NLP getting started: Classical GloVe–LSTM and into BERT for disaster tweet analysis
Hi! so I got promoted to a new position in my company to handle NLP and NLU problems since previously spent my time in the computer vision department. I am not actually fresh into this area, since I was previously exposed to RNN in the deep learning university course. I think I was just outdated with researches in this field, but I am trying to catch up recently.
Yes, I love Kaggle!
So I started to compete in one of the NLP starter competition, Real or Not? NLP with Disaster Tweets. This competition aims to identify whether a tweet is about a real disaster or not. For example, “LOOK AT THE SKY LAST NIGHT IT WAS ABLAZE” doesn’t mean it is about ragnarök or doomsday or our sun turned into a red giant. Twitter is very expressive and actually, that is the way it works.
Before proceeding, this is my Kaggle notebook to follow up this article, since I will only explain the essential parts.
I was thinking out how I should start by trying out some notebook to do preprocessing. Text cleaning is important since we want to make a words vector later.
Creating Corpus
Corpus is a bunch set of words used for analysis. I use NLTK to create the corpus.
from collections import defaultdict
from nltk.corpus import stopwords
from nltk.util import ngramsdef create_corpus(target):
    corpus = []
    for x in train[train["target"] == target]["text"].str.split():
        print(x)
        for i in x:
            corpus.append(i)

    return corpuscorpus = create_corpus(0)

stop = set(stopwords.words("english"))# Creating words dictionary
dictionary = defaultdict(int)
for word in corpus:
    if word in stop:
        dictionary[word] +=1
Text Cleansing
I just using basic regex for this one to fix sentences. Regex is basically a Swiss army knife for NLP (actually lowkey NLP exists and you could just use regex). Actually, I wrote my notebook’s preprocessing with this reference.
- Removing URLs. I know this could be undone for other tasks, but for simplicity, let's get rid of them.
def remove_url(text):
    url = re.compile(r'https?://\S+|www\.\S+')
    return url.sub(r'', text)df["text"] = df["text"].apply(lambda x: remove_url(x))
- Removing HTML tags. I think this is a normal byproduct of APIs.
def remove_html(text):
    html = re.compile(r'<.*?>')
    return html.sub(r'', text)df["text"] = df["text"].apply(lambda x: remove_html(x))
- Removing emojis. I know everyone likes it but at least in this part sadly I have to let it go.
def remove_emoji(text):
    emoji_pattern = re.compile("["
                               u"\U0001F600-\U0001F64F" #emoticons
                               u"\U0001F300-\U0001F5FF" #symbols&pics
                               u"\U0001F680-\U0001F6FF" #transportation pic
                               u"\U0001F1E0-\U0001F1FF" #flags
                               u"\U00002702-\U000027B0"
                               u"\U000024C2-\U0001F251"
                               "]+", flags = re.UNICODE)
    return emoji_pattern.sub(r'', text)df["text"] = df["text"].apply(lambda x: remove_emoji(x))
- Removing punctuation.
def remove_punctuation(text):
    table = str.maketrans('', '', string.punctuation)
    return text.translate(table)df["text"] = df["text"].apply(lambda x: remove_punctuation(x))
- Spelling checker. Try to install
pyspellchecker.
!pip install pyspellcheckerand after that,
from spellchecker import SpellCheckerspell = SpellChecker()

def correct_spellings(text):
    corrected_text = []

    misspelled_words = spell.unknown(text.split())
    for word in text.split():
        if word in misspelled_words:
            corrected_text.append(spell.correction(word))
        else:
            corrected_text.append(word)
    return " ".join(corrected_text)df['text']=df['text'].apply(lambda x : correct_spellings(x))
Actually, this step took a lot of time, but we do not know what we have not tried yet.
That is it. Now, some modeling!
GloVe Vectorization
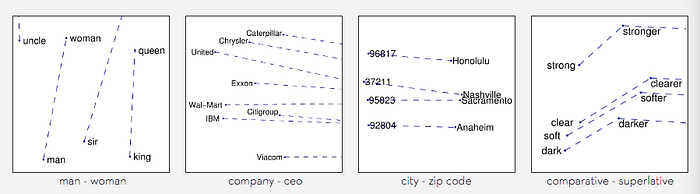
GloVe stands for Global Vectorization, developed by Stanford NLP group. According to their research, GloVe is an unsupervised learning algorithm for obtaining vector representations for words. Training is performed on aggregated global word-word co-occurrence statistics from a corpus, and the resulting representations showcase interesting linear substructures of the word vector space.
To create an embedding dictionary, I use available GloVe from the Kaggle dataset. This is how I create the embedding dataset from GloVe.
embedding_dict = {}

with open('../input/glove6b100dtxt/glove.6B.100d.txt','r') as glove:
    for line in glove:
        values = line.split()
        word = values[0]
        vectors = np.asarray(values[1:], 'float32')
        embedding_dict[word] = vectors

glove.close()
Tokenization
Tokenization is the process of separating our corpus into small pieces. That is because the machine can’t actually read directly from the words. I use a maximum length of 50 words, and if the sentence is less than 50 words, the rest will be padded with zeros.
MAX_LEN = 50
tokenizer_obj = Tokenizer()
tokenizer_obj.fit_on_texts(corpus)

sequences = tokenizer_obj.texts_to_sequences(corpus)

tweet_pad = pad_sequences(sequences,
                          maxlen = MAX_LEN,
                         truncating = 'post',
                         padding = 'post')word_index = tokenizer_obj.word_index
print('number of unique words: ', len(word_index))num_words = len(word_index) + 1
embedding_matrix = np.zeros((num_words,100))


for word, i in tqdm(word_index.items()):
    if i > num_words:
        continue

    embedding_vector = embedding_dict.get(word)
    if embedding_vector is not None:
        embedding_matrix[i] = embedding_vector
Building the Embedding–LSTM Model and predict the test
LSTM is a well-known RNN used in NLP, and actually reliable for handling sentences since it has memory track. This is what the LSTM with GloVe looks like.
model = Sequential()

glove_embedding = Embedding(num_words, 100, embeddings_initializer = Constant(embedding_matrix),
                     input_length = MAX_LEN,
                     trainable = False)

model.add(glove_embedding)
model.add(SpatialDropout1D(0.2))
model.add(LSTM(128, dropout = 0.2, recurrent_dropout = 0.2))
model.add(Dense(128, activation = 'relu', kernel_regularizer=regularizers.l1_l2(l1=1e-5, l2=1e-4)))
model.add(Dense(256, activation = 'relu', kernel_regularizer=regularizers.l1_l2(l1=1e-5, l2=1e-4)))
model.add(Dropout(0.2))
model.add(Dense(1, activation = 'sigmoid'))

optimizer = Adam(learning_rate=1e-5)

model.compile(loss = 'binary_crossentropy', optimizer = optimizer, metrics = ["accuracy"])
And then train the model and test it on the submission dataset. This yields the best accuracy of 0.8.

I am not quite satisfied with that, so I was looking for another notebook that is straightforward and easy to combine with the prior notebook, but using a transformer.
Using BERT
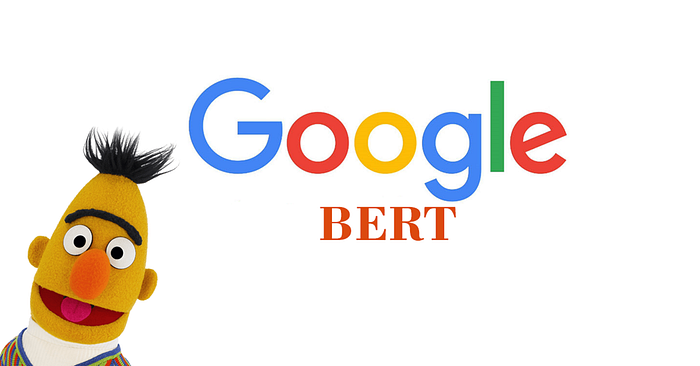
Bidirectional Encoder Representations from Transformers (BERT; Devlin et al., 2018) is a neural network-based technique for the natural language processing (NLP) pre-training model. BERT is the technology behind Google’s search engine. The library is accessible through Huggingface and it is suitable to use this pre-trained model for tweets.
If you want to learn more about BERT, you can learn it on the documentation. Furthermore, I learn about the theories behind BERT from this article.
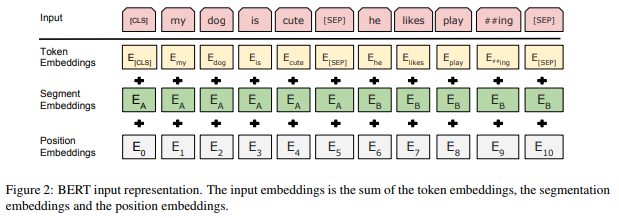
To use this model, first, we need to encode the tweets into three embedding tensors: token, mask, and segment. Later, we will add positional embedding tensor. I just copied the previous repository and replace the embedding and LSTM parts.
I borrowed some of the model buildings from this notebook. I still use Keras for building model, but I want to warn that actually many of transformer-related model was built in PyTorch, which is worth to try.
- Tokens are basically breakdowns of the sentence,
- Masks are parts of token which are hidden,
- Segment embedding to distinguish between paired input sequences.
- Positional embedding for the temporal property.
We will apply those embeddings to the train and test dataset.
def encode_tweets(tokenizer, tweets, max_len):
    nb_tweets = len(tweets)
    tokens = np.ones((nb_tweets,max_len),dtype='int32')
    masks = np.zeros((nb_tweets,max_len),dtype='int32')
    segs = np.zeros((nb_tweets,max_len),dtype='int32')for k in range(nb_tweets):
        # INPUT_IDS
        tweet = tweets[k]
        enc = tokenizer.encode(tweet)
        if len(enc) < max_len-2:
            tokens[k,:len(enc)+2] = [0] + enc + [2]
            masks[k,:len(enc)+2] = 1
        else:
            tokens[k,:max_len] = [0] + enc[:max_len-2] + [2]
            masks[k,:max_len] = 1
    return tokens, masks, segstokenizer = AutoTokenizer.from_pretrained("vinai/bertweet-base")train_tokens, train_masks, train_segs =
encode_tweets(tokenizer, train["text"].to_list(), MAX_LEN)train_labels = train["target"]test_tokens, test_masks, test_segs = encode_tweets(tokenizer,test["text"].to_list(), MAX_LEN)
And this is the vanilla BERT model,
def build_model(max_len):
    ids = Input((max_len,), dtype=tf.int32)
    attention = Input((max_len,), dtype=tf.int32)
    token = Input((max_len,), dtype=tf.int32)

    bertweet = TFAutoModel.from_pretrained("vinai/bertweet-base")
    x,_ = bertweet(ids,attention_mask=attention,token_type_ids=token)

    out = Dense(1,activation='sigmoid')(x[:,0,:])

    model = Model(inputs=[ids, attention, token], outputs = out)
    optimizer = Adam(learning_rate=1e-5)
    model.compile(loss='binary_crossentropy',
                  optimizer=optimizer,
                  metrics=['accuracy'])
    return model


model = build_model(MAX_LEN)
model.summary()
Note that this model is not tuned yet. The BERT pre-trained model runs shorter than the previous model, and gave a jump in accuracy :)

edit: I improved it a bit and the accuracy is currently at 0.845.
Conclusion
NLP and NLU are interesting and emerging AI disciplines. There is a lot of utilization, from Twitter sentiment analysis to the advanced cyberpunk self-decision-making government (should be a collaboration with RL). For those two simple approaches, we know that our model knows how to distinguish metaphor expression and the real news. BERT is a breakthrough but is not the best. There is a lot of BERT modification, and to mention GPT which aim to the general intelligence. I hope this article helps you to get into NLP.
References
- https://medium.com/brandlitic/5-key-takeaways-about-googles-bert-update-1a9850d42734
- https://nlp.stanford.edu/projects/glove/
- https://arxiv.org/abs/1810.04805
- https://github.com/google-research/bert
- https://www.kaggle.com/shahules/basic-eda-cleaning-and-glove/notebook
- https://www.kaggle.com/massinissaguendoul/nlp-disaster-tweet
About the Author
Salman is a cyberpunk enthusiast that loves coffee, lo-fi music, extragalactic astrophysics, and self-driving car so much. He is working on Asis and Mata — AI personal assistant products — as an applied researcher in the field of natural language understanding and reinforcement learning-driven self-learning agent. Previously, he was a computer vision applied researcher at the same parent company — Zapps AI, a research assistant at the Department of Astronomy, Institut Teknologi Bandung, and a robotics computer vision engineer at Dago Hoogeshool. He is part of the Nvidia developer program, Jakarta machine learning, and Google developer group Jakarta.
He has a dream to establish a self-working cyberpunk company which consists of AI agents as the employees.
He pursued an Astronomy and Astrophysics major at Institut Teknologi Bandung, spent a physics summer school at Princeton University, and Machine Learning Summer School (MLSS) 2020 which he is proudly taught by Max Welling’s AMLab and researchers from DeepMind.
Check his profile on LinkedIn.